
알고리즘
K번째 수

 array 배열을 from부터 to까지 자른다 잘라낸 배열을 오름차순으로 정렬한다 k번째 수를 찾아 리턴한다
코드
public int[] solution(int[] arr, int[][] commands) {
int[] answer = new int[commands.length];
int idx = 0;
for (int[] command :commands) {
int[] slicedArr = Arrays.copyOfRange(arr, command[0]-1, command[1]); // array를 slice합니다.
Arrays.sort(slicedArr); // 정렬을 합니다.
answer[idx++] = slicedArr[command[2]-1];
// 정렬한 Array의 idx번째를 뽑습니다.
}
return answer;
}
Java
복사
우선순위 큐를 활용한 코드
public int getKthNum(int[] command) {
int frIdx = command[0]; // 0번 from
int toIdx = command[1]; // 1번 to
int nth = command[2]; // n번째
int result = 0; // 문제에 0이 안나온다고 했기 때문에
PriorityQueue<Integer> pq = new PriorityQueue<>();
for (int i = frIdx-1; i < toIdx ; i++) { // 1번부터 시작하니 -1
pq.add(arr[i]);
}
for (int i = 0; i < nth; i++) {
result = pq.poll(); // stack의 pop과 비슷
}
return result;
}
public int[] solution(int[] arr, int[][] commands) {
this.arr = arr;
int[] answer = new int[commands.length];
for (int i = 0; i < commands.length; i++) {
answer[i] = getKthNum(commands[i]);
}
return answer;
}
Java
복사
Priority Queue란?
우선순위 큐로써 일반적인 큐의 구조 FIFO(First In First Out)를 가지면서,
데이터가 들어온 순서대로 데이터가 나가는 것이 아닌 우선순위를 먼저 결정하고
그 우선순위가 높은 데이터가 먼저 나가는 자료구조
Priority Queue 특징
1.
높은 우선순위의 요소를 먼저 꺼내서 처리하는 구조이다.우선순위 큐에 들어가는 원소는 비교가 가능한 기준이 있어야한다.
2.
내부 요소는 힙으로 구성되어 이진트리 구조로 이루어져 있다.
3.
내부구조가 힙으로 구성되어 있기에 시간 복잡도는 O(NLogN)이다.
4.
우선순위를 중요시해야 하는 상황에서 주로 쓰인다.
Priority Queue 동작
// 첫번째 값을 반환하고 제거 비어있다면 null
priorityQueueLowest.poll();
// 첫번째 값 제거 비어있다면 예외 발생
priorityQueueLowest.remove();
// 첫번째 값을 반환만 하고 제거 하지는 않는다.
// 큐가 비어있다면 null을 반환
priorityQueueLowest.peek();
// 첫번째 값을 반환만 하고 제거 하지는 않는다.
// 큐가 비어있다면 예외 발생
priorityQueueLowest.element();
// 초기화
priorityQueueLowest.clear();
Java
복사
토비의 스프링
복습
유튜브 강의 https://youtu.be/TA6ex6JoDtg
StatementStrategy interface정의 – 222p StatementStrategy interface를 구현한 DeleteAllStrategy() 구현 – 222p UserDao의 deleteAll()에 적용 – 225p deleteAll()에서 jdbcContextWithStatementStrategy분리 – 225p deleteAll()에서 jdbcContextWithStatementStrategy(StatementStrategy stmt) 호출하게 적용 – 225p AddStrategy() 구현 – 227p UserDao의 add()에 적용 – 228p전략 패턴 사용하기
StatementStrategy interface 정의
public interface StatementStrategy {
// connection을 받아서 PreparedStatement를 return
PreparedStatement makeStatement(Connection conn) throws SQLException;
}
Java
복사
AddStrategy
public class AddStrategy implements StatementStrategy{
User user;
public AddStrategy(User user) {
this.user = user;
}
@Override
public PreparedStatement makeStatement(Connection conn) throws SQLException {
PreparedStatement pstmt = null;
pstmt = conn.prepareStatement("INSERT INTO users(id, name, password) VALUES(?,?,?);");
pstmt.setString(1, user.getId());
pstmt.setString(2, user.getName());
pstmt.setString(3, user.getPassword());
return pstmt;
}
}
Java
복사
DataSource 인터페이스 적용
DataSource
Connection Pool을 관리하는 목적으로 사용되는 인터페이스
Connection Pool
데이터 베이스에 접근할 때마다 connection을 맺고 끊어주는 작업을 줄이기 위해 미리 생성해 둔 connection을 모아두는 곳
UserDao에 주입될 의존 오브젝트의 타입을 AWSConnectionMaker에서 AWSDataSource로 변경
@Configuration
public class UserDaoFactory {
@Bean
UserDao awsUserDao() {
return new UserDao(dataSource());
}
@Bean
DataSource dataSource() {
Map<String, String> env = System.getenv();
SimpleDriverDataSource dataSource = new SimpleDriverDataSource();
dataSource.setDriverClass(com.mysql.cj.jdbc.Driver.class);
dataSource.setUrl(env.get("DB_HOST"));
dataSource.setUsername(env.get("DB_USER"));
dataSource.setPassword(env.get("DB_PASSWORD"));
return dataSource;
}
}
Java
복사
DataSource는 Connection을 만들 때 가장 많이 쓰는 interface로 Java에 내장되어 있어서 따로 구현할 필요가 없다
@Configuration
public class UserDaoFactory {
@Bean
UserDao awsUserDao() {
return new UserDao(awsDataSource());
}
@Bean
UserDao localUserDao() {
return new UserDao(localDataSource());
}
@Bean
DataSource awsDataSource() {
Map<String, String> env = System.getenv();
SimpleDriverDataSource dataSource = new SimpleDriverDataSource();
dataSource.setDriverClass(com.mysql.cj.jdbc.Driver.class);
dataSource.setUrl(env.get("DB_HOST"));
dataSource.setUsername(env.get("DB_USER"));
dataSource.setPassword(env.get("DB_PASSWORD"));
return dataSource;
}
@Bean
DataSource localDataSource() {
Map<String, String> env = System.getenv();
SimpleDriverDataSource dataSource = new SimpleDriverDataSource();
dataSource.setDriverClass(com.mysql.cj.jdbc.Driver.class);
dataSource.setUrl("localhost");
dataSource.setUsername("root");
dataSource.setPassword("12345678");
return dataSource;
}}
Java
복사
UserDao에 DataSource 적용
public class UserDao {
private DataSource dataSource; // DataSource를 의존하게 변경
public UserDao(DataSource dataSource) {
this.dataSource = dataSource; // 생성자도 변경
}
…
public void jdbcContextWithStatementStrategy(StatementStrategy stmt) throws SQLException {
Connection c = null;
PreparedStatement pstmt = null;
try {
c = dataSource.getConnection(); // datasource를 사용하게 변경
Java
복사
익명 내부 클래스 적용
StatementStrategy Interface의 구현체인 DeleteAllStrategy()를 쓰는 곳이 deleteAll()한군데 뿐이기 때문에 굳이 class를 새로 만들 필요가 없다
public void deleteAll() throws SQLException {
jdbcContextWithStatementStrategy(new StatementStrategy() {
@Override
public PreparedStatement makeStatement(Connection conn) throws SQLException {
PreparedStatement stmt = conn.prepareStatement("delete from users");
return stmt;
}
});
}
Java
복사
public void jdbcContextWithStatementStrategy(StatementStrategy stmt) throws SQLException
Java
복사
jdbcContextWithStatementStrategy를 쓸 때는 StatementStrategy인터페이스 구현체를 넘겨야 함
클래스를 자꾸 만들면 많아지기 때문에 이렇게 한번만 쓰는 경우는 내부 클래스를 사용
public void deleteAll() throws SQLException {
// "delete from users"
StatementStrategy deleteAllStrategy = new StatementStrategy() {
@Override
public PreparedStatement makeStatement(Connection conn) throws SQLException {
return conn.prepareStatement("delete from users");
}
};
jdbcContextWithStatementStrategy(deleteAllStrategy);
}
Java
복사
StatementStrategy deleteAllStrategy = new StatementStrategy() 생략 가능
익명 클래스 적용한 deleteAll()
public void deleteAll() throws SQLException {
// "delete from users"
jdbcContextWithStatementStrategy(new StatementStrategy() {
@Override
public PreparedStatement makeStatement(Connection conn) throws SQLException {
return conn.prepa reStatement("delete from users");
}
});
}
Java
복사
익명 클래스 적용한 add()
public void add(final User user) throws SQLException {
// DB접속 (ex sql workbeanch실행)
jdbcContextWithStatementStrategy(new StatementStrategy() {
@Override
public PreparedStatement makeStatement(Connection conn) throws SQLException {
PreparedStatement pstmt = null;
pstmt = conn.prepareStatement("INSERT INTO users(id, name, password) VALUES(?,?,?);");
pstmt.setString(1, user.getId());
pstmt.setString(2, user.getName());
pstmt.setString(3, user.getPassword());
return pstmt;
}
});
}
Java
복사
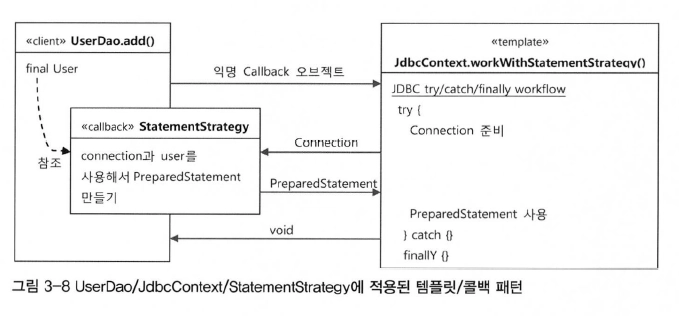
Jdbc Context의 분리
JDBC
DB에 접근할 수 있도록 자바에서 제공하는 API
JAVA 추상화의 대표적인 예로 어떤 DB 서버든 같은 메소드로 접근한다.
jdbcContextWithStatementStrategy는 다른 Dao에서도 쓸 수 있기 때문에 UserDao에서 분리
public class JdbcContext {
private DataSource dataSource;
public JdbcContext(DataSource dataSource) {
this.dataSource = dataSource;
}
// JdbcContext는 클래스 이름으로 썼으므로 workWithStatementStrategy라는 이름으로 바꿈
public void workWithStatementStrategy(StatementStrategy stmt) throws SQLException {
Connection c = null;
PreparedStatement pstmt = null;
try {
c = dataSource.getConnection();
pstmt = stmt.makeStatement(c);
// Query문 실행
pstmt.executeUpdate();
} catch (SQLException e) {
throw e;
} finally {
if (pstmt != null) {
try {
pstmt.close();
} catch (SQLException e) {
}
}
if (c != null) {
try {
c.close();
} catch (SQLException e) {
}
}
}
}
}
Java
복사
종속성이 dataSource에 있기 때문에 Constructor로 받아줌
UserDao에 JdbcContext 의존하게 변경
public class UserDao {
private final DataSource dataSource;
private final JdbcContext jdbcContext;
public UserDao(DataSource dataSource) {
this.dataSource = dataSource;
this.jdbcContext = new JdbcContext(dataSource);
}
public void add(final User user) throws SQLException {
// DB접속 (ex sql workbeanch실행)
jdbcContext.workWithStatementStrategy(new StatementStrategy() {
@Override
public PreparedStatement makeStatement(Connection conn) throws SQLException {
PreparedStatement pstmt = null;
pstmt = conn.prepareStatement("INSERT INTO users(id, name, password) VALUES(?,?,?);");
pstmt.setString(1, user.getId());
pstmt.setString(2, user.getName());
pstmt.setString(3, user.getPassword());
return pstmt;
}
});
}
Java
복사
책에서는 set을 썼는데 이 방식은 xml설정 방식에서 set을 쓰기 때문에 set을 사용하게 써놓았습니다. 지금은 xml설정 방식을 잘 쓰지 않습니다.
지금까지 적용했던 Strategy 패턴들
클래스이름 | Context | 전략 | 선택 전략 |
ReadLineParser | ReadLineParser | Parser | HospitalParser
PopulationStatisticsParser |
UserDao | .add(), .findById() | ConnectionMaker | AwsConnectionMaker
LocalConnectionMaker
TeacherConnectionMaker |
JdbcContext | workWithStatementStrategy | StatementStrategy | 익명 클래스 add, deleteAll |
Template Callback 적용
public void executeSql(String sql) throws SQLException {
this.jdbcContext.workWithStatementStrategy(new StatementStrategy() {
@Override
public PreparedStatement makePreparedStatement(Connection connection) throws SQLException {
return connection.prepareStatement(sql);
}
});
}
public void deleteAll() throws SQLException {
this.executeSql("delete from users");
// 쿼리만 넘기게 함
}
Java
복사
다른 Dao에서도 사용할 수 있도록 공유 템플릿 클래스로 옮겨두는 것이 좋다
UserDao.java
public void deleteAll() throws SQLException {
this.jdbcContext.executeSql("delete from users");
}
Java
복사
JdbcContext.java
public void executeSql(String sql) throws SQLException {
this.workWithStatementStrategy(new StatementStrategy() {
@Override
public PreparedStatement makePreparedStatement(Connection connection) throws SQLException {
return connection.prepareStatement(sql);
}
});
}
Java
복사
Jdbc Template 적용
UserDao.java
private JdbcTemplate jdbcTemplate;
public UserDao(DataSource dataSource) {
this.jdbcTemplate = new JdbcTemplate(dataSource);
}
Java
복사
deleteAll()
public void deleteAll() throws SQLException {
this.jdbcTemplate.update("delete from users");
}
Java
복사
add()
public void add(final User user) throws SQLException {
this.jdbcTemplate.update("insert into users(id, name, password) values (?, ?, ?);",
user.getId(), user.getName(), user.getPassword());
}
Java
복사
getCount()
public int getCount() throws SQLException {
return this.jdbcTemplate.queryForObject("select count(*) from users;", Integer.class);
}
Java
복사
findById()
public User findById(String id) {
String sql = "select * from users where id = ?";
RowMapper<User> rowMapper = new RowMapper<User>() {
@Override
public User mapRow(ResultSet rs, int rowNum) throws SQLException {
User user = new User(rs.getString("id"), rs.getString("name"),
rs.getString("password"));
return user;
}
};
return this.jdbcTemplate.queryForObject(sql, rowMapper, id);
}
Java
복사
RowMapper 인터페이스 구현체로 ResultSet의 정보를 User에 매핑할 때 씁니다
getAll()
public List<User> getAll() {
String sql = "select * from users order by id";
RowMapper<User> rowMapper = new RowMapper<User>() {
@Override
public User mapRow(ResultSet rs, int rowNum) throws SQLException {
User user = new User(rs.getString("id"), rs.getString("name"),
rs.getString("password"));
return user;
}
};
return this.jdbcTemplate.query(sql, rowMapper);
}
Java
복사
jdbcTemplate.query() 를 씁니다. 그리고 List<User> getAll() List<User> 를 리턴하게 해놓으면 모든 User를 List에 담아서 리턴 해줍니다.
getAllTest()
@Test // 지우고 나서 size가 0개인지 test
@DisplayName("없을때 빈 리스트 리턴 하는지, 있을때 개수만큼 리턴 하는지")
void getAllTest() {
userDao.deleteAll();
List<User> users = userDao.getAll();
assertEquals(0, users.size());
userDao.add(user1);
userDao.add(user2);
userDao.add(user3);
users = userDao.getAll();
assertEquals(3, users.size());
}
Java
복사
RowMapper의 중복 제거
RowMapper<User> rowMapper = new RowMapper<User>() {
@Override
public User mapRow(ResultSet rs, int rowNum) throws SQLException {
User user = new User(rs.getString("id"), rs.getString("name"),
rs.getString("password"));
return user;
}
};
public User findById(String id) {
String sql = "select * from users where id = ?";
return this.jdbcTemplate.queryForObject(sql, rowMapper, id);
}
public List<User> getAll() {
String sql = "select * from users order by id";
return this.jdbcTemplate.query(sql, rowMapper);
}
Java
복사
