
• SUMMARY
주차 | 3주차 |
날짜 | 2022. 10. 5. 수요일 |
주제 | 1. Class 사용 목적, 방법
2. 자바의 의존성 주입 원칙 (NumberGenerator- Calculator 예제)
3. Collection 사용법 (List, Map, Set) |
실습 | 1. Intellij로 git push하기
2. Interface구현체 구현 및 Di
3. List 입출력 |
과제 |
 자바 기초 복습
자바의 각종 개념 및 원리..
의존성 주입 원칙 실습
자바 개념 및 원리
■ OOP(Object Oriented Programming)
객체 지향 프로그래밍이란 객체들의 모임으로 프로그래밍하는 것
•
객체 지향 프로그래밍은 컴퓨터 프로그램을 여러개의 독립된 단위, 즉 객체들의 모임으로 파악하고자 하는 것. 각각의 객체는 메시지를 주고받고, 데이터를 처리할 수 있다. (협력)
•
함수형 프로그래밍과 반대
•
프로그램을 유연하고 변경이 용이하게 하기 때문에 대규모 소프트웨어 개발에 많이 사용(유지보수, 재사용성)
◦
다형성 ( 역할-interface, 구현-class, 운전자-자동차)
■ SOLID
•
SRP : 단일 책임 원칙 (single responsibility principle)
◦
한 클래스는 하나의 책임만 가져야 한다.
•
OCP : 개방-폐쇄 원칙 (Open/closed principle)
◦
소프트웨어 요소는 확장에는 열려 있으니 변경에는 닫혀 있어야 한다.
•
LSP : 리스코프 치환 원칙 (Liskov substitution principle)
◦
프로그램의 객체는 프로그램의 정확성을 깨뜨리지 않으면서 하위 타입의 인스턴스로 바꿀 수 있어야 한다.
•
ISP : 인터페이스 분리 원칙 (Interface segregation principle)
◦
특정 클라이언트를 위한 인터페이스 여러 개가 범용 인터페이스 하나보다 낫다.
•
DIP : 의존관계 역전 원칙 (Dependency inversion principle)
◦
프로그래머는 “추상화에 의존해야지, 구체화에 의존하면 안된다.” 의존성 주입은 이 원칙을 따르는 방법 중 하나
■ DI (Dependency Injection)
의존성 주입이란 하나의 객체가 다른 객체의 의존성을 제공하는 테크닉
DI한다 → constructor를 이용해 interface구현체를 넘겨서 초기화 시킨다.
의존관계
“A가 B를 의존한다”는 의존대상 B가 변하면, 그것이 A에 영향을 미친다. 라는 의미
의존관계 주입(DI)
의존관계를 외부에서 결정하고 주입하는 것
의존관계 주입
•
클래스 모델이나 코드에는 런타임 시점의 의존관계가 드러나지 않는다. 그러기 위해서는 인터페이스만 의존하고 있어야 한다.
•
런타임 시점의 의존관계는 컨테이너나 팩토리 같은 제3의 존재가 결정한다.
•
의존관계는 사용할 오브젝트에 대한 레퍼런스를 외부에서 제공(주입)해줌으로써 만들어진다.
의존관계 주입 방법
1.
생성자 주입
2.
setter 주입
3.
필드 주입
4.
일반 메서드 주입
DI 장점
1.
의존성이 줄어든다.
2.
재사용성이 높아진다.
3.
테스트하기 좋은 코드가 된다.
4.
가독성이 높아진다.
■ POJO(Plain Old Java Object)
POJO란 오래된 방식의 간단한 자바 오브젝트
•
특정 '기술'에 종속되어 동작하는 것이 아닌 순수한 자바 객체
Calculator 예제를 통한 의존 관계
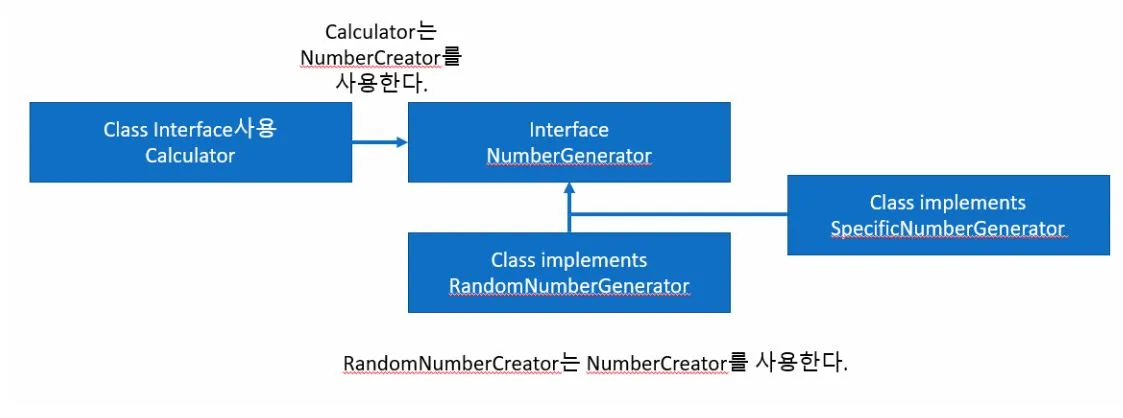
DI 과정
1.
interface를 구현한 class를 만들고
•
RandomNumGenerator 클래스, SpecificNumGenerator 클래스
2.
interface를 멤버 변수로 class에 선언하고
•
Calculator 클래스에 NumberGenerator numberGenerator 선언
3.
interface를 생성하고 Number를 생성하는 interface 정의
•
NumberGenerator.interface
4.
class를 인스턴스화 시킬 때 interface구현체를 new해서 DI 해준다.
•
Main 에서 Calculator 클래스 인스턴스화 시킬 때 Calculator randomCalculator= new Calculator(new RandomNumGenerator()); 로 DI
NumberGenerator 인터페이스
public interface NumberGenerator {
int generate(int num);
}
Java
복사
RandomNumGenerator 클래스
public class RandomNumGenerator implements NumberGenerator {
//랜덤으로 숫자 생성
@Override
public int generate(int num) {
return (int)(Math.random()*num);
}
}
Java
복사
SpecificNumGenerator 클래스
public class SpecificNumGenerator implements NumberGenerator {
//특정 숫자 생성:2000을 곱한 값
@Override
public int generate(int num) {
return 2000*num;
}
}
Java
복사
ByPassNumGenerator 클래스
public class ByPassNumGenerator implements NumberGenerator{
//generate한 숫자를 그대로 넘김
@Override
public int generate(int num) {
return num;
}
}
Java
복사
Calculator 클래스
public class Calculator {
//numberGenerator로 만든 숫자를 가지고
// 사칙연산 결과 출력
private NumberGenerator numberGenerator;
private int baseNum=10;
public Calculator(NumberGenerator numberGenerator) {
this.numberGenerator = numberGenerator;
}
public Calculator(NumberGenerator numberGenerator, int baseNum) {
this.numberGenerator = numberGenerator;
this.baseNum = baseNum;
}
//baseNum에 Generate한 숫자 더하기
public void plus(int num){
System.out.println( baseNum + numberGenerator.generate(num));
}
}
Java
복사
Main 클래스
public class Main {
public static void main(String[] args) {
//Calculator 클래스 인스턴스 생성시,
// NumberGenerator interface구현체인 RandomNumGenerator를 new해서 DI
Calculator randomCalculator= new Calculator(new RandomNumGenerator());
randomCalculator.plus(10);
Calculator specificCalculator = new Calculator(new SpecificNumGenerator());
specificCalculator.plus(20);
Calculator bypassCalculator = new Calculator(new ByPassNumGenerator(), 50000);
bypassCalculator.plus(100);
}
}
Java
복사
Reference

List 인터페이스
List 컬렉션은 배열과 비슷하게 객체를 인덱스로 관리한다. 배열과의 차이는 저장 용량이 자동으로 증가하며 객체를 저장할 때 자동 인덱스가 부여된다는 것이다. 그리고 추가,삭제,검색을 위한 다양한 메소드들이 제공된다.List컬렉션은 객체 자체를 저장하는 것이 아니라 다음 그림과 같이 객체의 번지를 참조한다. 그렇기 때문에 동일한 객체를 중복 저장할 수 있는데 이 경우 동일한 번지가 참조된다. null도 저장이 가능하며 이경우 해당인덱스는 객체를 참조하지 않는다.

List컬렉션에 객체를 추가할 때에는 add() 메소드를 사용, 객체를 찾아올 때에는 get()메소드를 사용. 그리고 객체 삭제는 remove()메소드를 사용한다. 다음은 List 컬렉션에 String 객체를 추가,삽입,검색,삭제하는 방법이다.
List<String> list = ···;
list.add("홍길동"); //맨 끝에 객체 추가
list.add(1,"신용권"); //지정된 인덱스에 객체 삽입
String str = list.get(1); //인덱스로 객체 검색
list.remove(0); //인덱스로 객체 삭제
list.remove("신용권"); //객체 삭제
Java
복사
List 컬렉션에 저장된 모든 객체를 대상으로 하나씩 가져와 처리하고 싶다면 인덱스를 이용하는 방법과 향상된 for문을 이용하는 방법이 있다. 다음은 인덱스를 이용하는 방법이다. List 컬렉션의 size()메소드는 현재 저장되어 있는 객체 수를 리턴한다.
List<String> list = ···;
for(int i=0; i<list.size(); i++){
String str = list.get(i);
}
Java
복사
다음은 향상된 for문을 이용하는 방법이다. List컬렉션에 저장된 객체 수만큼 반복하면서 객체를 하나씩 str 변수에 대입한다.
for(String str:list){
}
Java
복사
ArrayList
List인터페이스의 대표적인 구현 클래스이다.ArrayList를 생성하기 위해서는 저장할 객체 타입을 E타입 파라미터 자리에 표기하고 기본 생성자를 호출하면 된다. 예를 들어 String을 저장하는 ArrayList는 다음과 같이 생성할 수 있다.
List list = new ArrayList();List list = new ArrayList<>();
두 코드는 동일하게 String을 저장하는 ArrayList 객체를 생성한다.
ArrayList에 객체를 추가하면 0번 인덱스부터 차례대로 저장된다. ArrayList에서 특정 인덱스의 객체를 제거하면 바로 뒤 인덱슷부터 마지막 인덱스까지 모두 앞으로 1씩 당겨진다. 마찬가지로 특정 인덱스에 객체를 삽입하면 해당 인덱스부터 마지막 인덱스까지 모두 1씩 밀려난다.
이런 동작 때문에 저장된 객체 수가 많고 특정 인덱스에 객체를 추가하거나 제거하는 일이 빈번하다면 ArrayList보다는 나중에 학습 할 LinkedList를 사용하는 것이 좋다. 하지만 인덱스를 이용해서 객체를 찾거나 맨 마지막에 객체를 추가하는 경우에는 ArrayList가 더 좋은 성능을 발휘한다.
실습
// 1. 정보를 담을 Student 클래스 만들기.
public class Student {
// 필요한 정보를 변수로 선언
private int classNo;
private String name;
private String gitRepositoryAddress;
// 생성자를 통한 정보 입력
public Student(int classNo, String name, String gitRepositoryAddress) {
this.classNo = classNo;
this.name = name;
this.gitRepositoryAddress = gitRepositoryAddress;
}
// 결과 출력 시, 문자열 리턴을 위한 toString() 오버라이딩.
@Override
public String toString(){
return classNo + " " + name + " " + gitRepositoryAddress;
}
}
Java
복사
이 클래스는 학생의 반, 이름 ,깃허브 주소를 멤버변수로 한다.객체가 출력될 때는 소속,이름,repository를 출력할 수 있게 toString() 메소드를 재정의한다.
// 2. Student 클래스를 활용한 List 만들기
public class Names {
// List 객체 생성.
// Generic을 사용하여, List에는 Student 객체만 들어갈 수 있음.
private List<String> students = new ArrayList<>();
private List<Student> studentObjs = new ArrayList<>();
// List의 .add()메소드를 활용한 정보 입력 메소드
// Student 클래스에서 작성한 생성자로, 객체 생성과 동시에 List에 정보 입력
public List<Student> getStudetObjs(){
this.studentObjs.add(new Student(1,"김경록","https://github.com/Kyeongrok/like-lion-java"));
this.studentObjs.add(new Student(1,"권하준","https://github.com/dongyeon-0822/java-project-exercise"));
this.studentObjs.add(new Student(1,"조성윤","https://github.com/kang-subin/Java"));
this.studentObjs.add(new Student(3,"안예은","https://github.com/KoKwanwun/LikeLion.git"));
this.studentObjs.add(new Student(1,"남우빈","https://github.com/lcomment/Algorithm_Solution--Java/tree/main/LikeLion"));
// 선언한 리턴타입(List<Student>)에 맞춰 스스로를 리턴
return this.studentObjs;
}
public List<String> names(){
this.students.add("조성윤");
this.students.add("안예은");
this.students.add("남우빈");
this.students.add("최경민");
this.students.add("안준휘");
this.students.add("하채민");
return this.students;
}
}
Java
복사
학생의 속성을 넣어둘 List를 만든다.LikeLion2thNames의 생성자이다. LikeLion2thNames가 생성될 때, 학생의 이름이 students에 추가된다. 학생의 이름이 String이기에 students를 선언할 때 List으로 자료형 매개변수를 지정하였다.studentObjs 변수를 갖는다. 이 변수는 List 자료형이며, 자료형 매개변수로 Student를 갖는다. ArrayList의 객체이다.
public class LikeLion2th {
private List<String> students= new ArrayList<>();
private List<Student> studentObjs = new ArrayList<>();
public LikeLion2th() {
Names names = new Names();
this.students = names.names();
this.studentObjs=names.getStudetObjs();
}
//멋사자 2기 학생의 이름이 들어있는 list를 return하는 method
public List<String> getStudentList(){
return this.students;
}
public List<Student> getStudentObjs(){
return this.studentObjs;
}
}
Java
복사
public class ListPracticeMain {
public static void main(String[] args) {
LikeLion2th likeLion2th= new LikeLion2th();
List<String> students = likeLion2th.getStudentList();
// 빈 List 객체에 정보를 호출함.
List<Student> studentObjs = likeLion2th.getStudentObjs();
// for문 통해 List에 입력된 정보를 한 줄씩 출력.
for(String student : students){
System.out.println(student);
}
for(Student studentObj : studentObjs){
System.out.println(studentObj.toString());
}
System.out.println(students.size());
}
}
Java
복사
