
1. 알고리즘
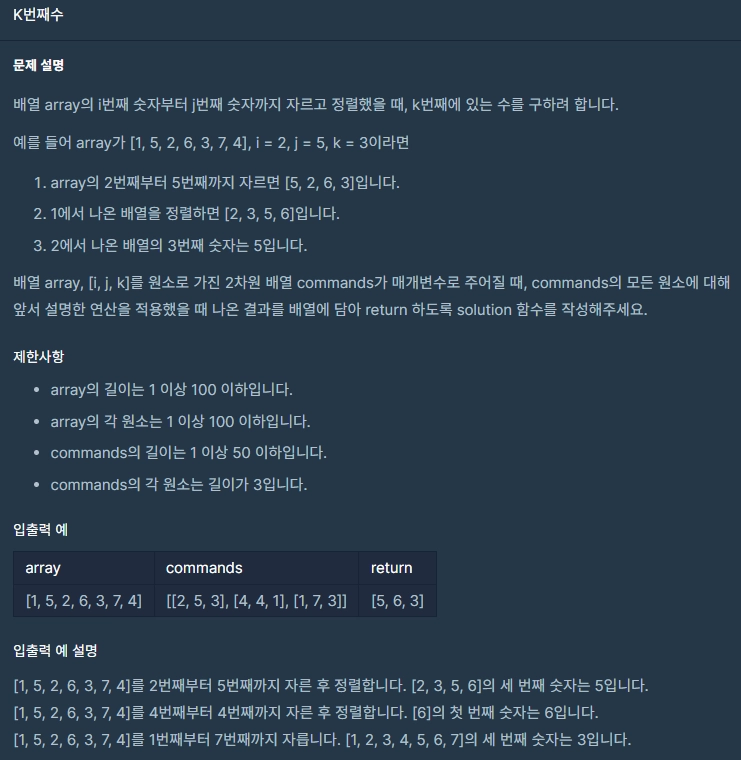
1.1 프로그래머스 - k번째 수
•
주어진 배열을 command 배열의 구간 만큼 자르고,
•
정렬한 후,
•
정렬한 배열의 k번째의 수를 출력해야 하는 문제이다.
Code
Arrays.copyOfRange()를 활용한 코드
PriorityQueue를 활용한 코드
1.2 우선순위 큐 (Priority Queue)란?
•
일반적으로 큐는 데이터를 일시적으로 쌓아두기 위한 자료구조
•
FIFO(First-In First-Out)의 구조 → 선입선출의 구조
•
그러나, 우선순위 큐는 먼저 들어온 순서대로 데이터가 나가는 것이 아님
◦
우선순위를 먼저 결정하고, 우선순위가 높은 요소가 먼저 나가는 자료구조
•
heap을 이용하여 구현하는 것이 일반적
2. 토비의 스프링
2.1 StatementStrategy
코드
2.2 AddStrategy
코드
2.3 DataSource Interface
DataSource란?
•
db와 관계된 커넥션 정보를 담고 있으며, 빈으로 등록하여 인자로 넘겨준다
◦
이 과정을 통해, Spring은 Datasource로 Db와의 연결을 획득한다.
•
코드로 DataSource의 활용법을 살펴보자.
•
아래 코드는 빈을 생성하고 관계를 맺어주는 UserDaoFactory 클래스이다.
package com.likelion.dao;
import org.springframework.context.annotation.Bean;
import org.springframework.context.annotation.Configuration;
import org.springframework.jdbc.datasource.SimpleDriverDataSource;
import javax.sql.DataSource;
import java.util.Map;
@Configuration
public class UserDaoFactory {
@Bean
public UserDao awsUserDao() {
return new UserDao(awsDatasource()); //host가 aws인 db 사용 시, awsDatasource() 주입
}
@Bean
public UserDao localUserDao(){
return new UserDao(localDatasource()); //host가 local인 db 사용 시, localDatasource() 주입
}
//awsDataBase Connection 설정
@Bean
public DataSource awsDatasource(){
Map<String, String> env = System.getenv();
SimpleDriverDataSource dataSource = new SimpleDriverDataSource();
dataSource.setDriverClass(com.mysql.cj.jdbc.Driver.class); //드라이버 세팅
dataSource.setUrl(env.get("DB_HOST"));
dataSource.setUsername(env.get("DB_USER"));
dataSource.setPassword(env.get("DB_PASSWORD"));
return dataSource;
}
//local Database Connection 설정
@Bean
public DataSource localDatasource(){
SimpleDriverDataSource dataSource = new SimpleDriverDataSource();
dataSource.setDriverClass(com.mysql.cj.jdbc.Driver.class);
dataSource.setUrl("localhost");
dataSource.setUsername("root");
dataSource.setPassword("12345678");
return dataSource;
}
}
Java
복사
public class UserDao {
private DataSource dataSource; // DataSource를 의존하게 변경
public UserDao(DataSource dataSource) {
this.dataSource = dataSource; // 생성자도 변경
}
public void jdbcContextWithStatementStrategy(StatementStrategy stmt) throws SQLException {
Connection c = null;
PreparedStatement pstmt = null;
try {
c = dataSource.getConnection(); // datasource를 사용하게 변경
/.../
}
}
}
Java
복사
2.4 Dependency Injection 시, final 키워드를 썼을 때 이점
•
위의 코드 UserDao를 다시 살펴봅시다.
public class UserDao {
private final DataSource dataSource; // final 키워드로 dataSource 선언
public UserDao(DataSource dataSource) {
this.dataSource = dataSource; // factory에서 호출해서, 조립이 완료됨 -> 바뀔 여지가 없음
}
public void jdbcContextWithStatementStrategy(StatementStrategy stmt) throws SQLException {
Connection c = null;
PreparedStatement pstmt = null;
try {
c = dataSource.getConnection();
/.../
}
}
}
Java
복사
•
final을 썼을 때 이점
◦
신뢰성 - 불변이기 때문에 변화를 고려하지 않아도 됨
◦
메모리를 적게 씀 - 바뀔 여지가 없기 때문에 바뀌는데 필요한 메모리 할당이 필요 없음
◦
DI를 하고 나서 DataSource가 바뀌는 경우 - 무슨 일이 일어날지 예측이 안됨
•
final을 쓰는 이유
◦
스프링에서 DI 되었다면 이미 Factory에서 조립이 끝난 상태이므로 변화하지 않는게 좋다
◦
변화하지 않으므로 final로 선언해주는 게 좋다.
▪
메모리 사용에 유리하고 신뢰성을 보장하기 때문
2.5 익명 클래스 적용하기
•
우리는 part 2.1에서 StatementStrategy 인터페이스를 하나 생성하였습니다.
•
이 인터페이스는 PreparedStatement를 생성하는 역할을 가집니다.
•
만약 PreparedStatement 인터페이스를 구현해야 하는 구현 클래스가 여러개라면, 매번 이 인터페이스를 구현해야 하는 구현체 클래스들을 생성해주어야 합니다.
◦
만약, 이 구현체 클래스(ex. DeleteAllStrategy)가 하나의 모듈에서만 사용된다면, 굳이 클래스로 만들 필요가 없을 것입니다.
◦
이는, 익명 클래스로 해결이 가능합니다.
익명 클래스 도입 전 코드 (deleteAll())
익명 클래스 도입 후 코드 (deleteAll())
add() 메소드에도 익명 클래스를 적용하자.
익명 클래스 도입 후 add() 메소드
2.6 JdbcContext로 분리 (234pg)
•
JDBC의 일반적인 작업 흐름을 담고 있는 jdbcContextWithStatementStrategy()는 다른 DAO에서도 사용 가능하다.
•
따라서, jdbcContextWithStatementStartegy()를 UserDao 클래스 밖으로 독립시켜서 모든 DAO가 사용할 수 있게 해보자.
public class JdbcContext {
private DataSource dataSource;
public JdbcContext(DataSource dataSource) {
this.dataSource = dataSource; //dataSource에 의존
}
public void workWithStatementStrategy(StatementStrategy stmt) throws SQLException {
Connection c = null;
PreparedStatement pstmt = null;
try {
c = dataSource.getConnection(); //dataSource 오브젝트에게 커넥션 생성 위임
pstmt = stmt.makeStatement(c); //StatementStartegy 인터페이스에게 sql 쿼리문 생성 위임
// Query문 실행
pstmt.executeUpdate();
} catch (SQLException e) {
throw e;
} finally {
if (pstmt != null) {
try {
pstmt.close();
} catch (SQLException e) {
}
}
if (c != null) {
try {
c.close();
} catch (SQLException e) {
}
}
}
}
}
Java
복사
•
위의 코드는 jdbcContextWithStatementStrategy() 메소드를 JdbcContext 라는 독립된 클래스로 분리한 것이다.
•
이제, UserDao 클래스 뿐만 아니라 다른 타입의 dao 클래스에서도 커넥션 생성 및 쿼리문 생성, 실행 등의 jdbc 일반적인 작업 흐름을 담고 있는 메소드를 실행시킬 수 있다.
2.7 UserDao와 JdbcContext
•
기존의 UserDao는 ConnectionMaker라는 커넥션 생성의 역할을 가지고 있는 인터페이스에만 의존했습니다.
•
그러나, 커넥션 생성과 쿼리문 생성, 실행 등의 jdbc의 일반적인 작업 흐름을 담당하는 클래스인 JdbcContext를 2.6 part에서 생성하였습니다.
•
따라서, JDBC를 활용해야 하는 UserDao 클래스는 JdbcContext 클래스와 종속성을 가지게 됩니다.
public class UserDao {
private final JdbcContext jdbcContext;
public UserDao(DataSource dataSource) {
this.jdbcContext = new JdbcContext(dataSource);
}
public void add(final User user) throws SQLException {
// DB접속 (ex sql workbeanch실행)
// 템플릿 콜백 패턴 -> workWithStatementStrategy 메소드내에 tatementStrategy의 구현체 내용 구현
jdbcContext.workWithStatementStrategy(new StatementStrategy() {
@Override
public PreparedStatement makeStatement(Connection conn) throws SQLException {
PreparedStatement pstmt = null;
pstmt = conn.prepareStatement("INSERT INTO users(id, name, password) VALUES(?,?,?);");
pstmt.setString(1, user.getId());
pstmt.setString(2, user.getName());
pstmt.setString(3, user.getPassword());
return pstmt;
}
});
}
Java
복사
•
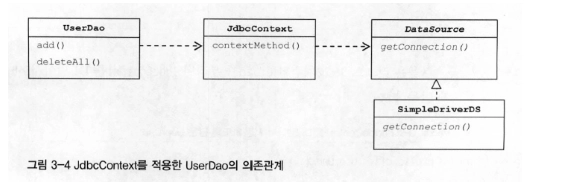
2.6의 과정과 2.7의 리팩토링을 거치면, UserDao의 의존관계는 위의 그림과 같게 됩니다.

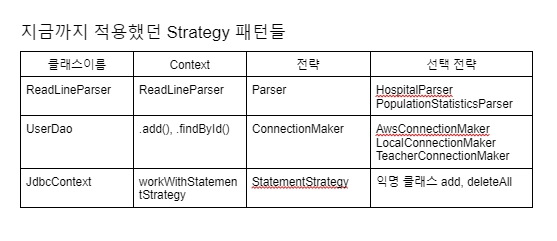
강의를 통해 구현했었던 전략 패턴이 적용된 코드
2.8 JdbcContext와 DataSource의 관계 설정을 생성자에서 한 이유
public class UserDao {
private final JdbcContext jdbcContext;
public UserDao(DataSource dataSource) {
this.jdbcContext = new JdbcContext(dataSource); //구체 클래스와의 관계가 설정에 직접 노출됨
}
public void add(final User user) throws SQLException {
// DB접속 (ex sql workbeanch실행)
// 템플릿 콜백 패턴 -> workWithStatementStrategy 메소드내에 StatementStrategy의 구현체 내용 구현
jdbcContext.workWithStatementStrategy(new StatementStrategy() {
@Override
public PreparedStatement makeStatement(Connection conn) throws SQLException {
PreparedStatement pstmt = null;
pstmt = conn.prepareStatement("INSERT INTO users(id, name, password) VALUES(?,?,?);");
pstmt.setString(1, user.getId());
pstmt.setString(2, user.getName());
pstmt.setString(3, user.getPassword());
return pstmt;
}
});
}
Java
복사
2.9 Template Callback 적용 (247 pg)
•
executeQuery ⇒ Query를 받아서 PreparedStatement 를 만든 후 실행하는 기능
•
public void executeSql(String sql) throws SQLException {
this.workWithStatementStrategy(new StatementStrategy() {
@Override
public PreparedStatement makePreparedStatement(Connection connection) throws SQLException {
return connection.prepareStatement(sql);
}
});
}
Java
복사
public void deleteAll() throws SQLException {
this.jdbcContext.executeSql("delete from users");
}
Java
복사
•
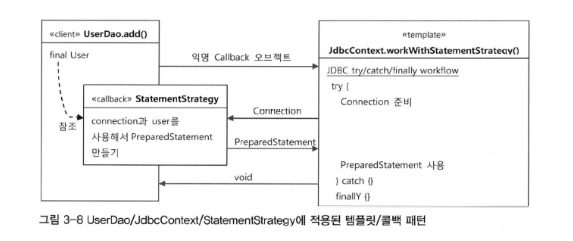
템플릿 콜백 패턴이 적용된 구조를 그림으로 나타낸 것이다.
◦
add() 메소드 내에서 JdbcContext 클래스의 workWithStatementStragy() 메소드를 호출한다. 이 때, 템플릿 콜백 패턴을 적용하여, StatementStrategy 인터페이스의 구현 클래스를 구현해준다.
2.10 JdbcTemplate 적용 (262pg)
JDBC Template란?
Spring JDBC 접근 방법 중 하나로, 내부적으로 Plain JDBC API를 사용하지만 아래의 문제점을 해결한 스프링에서 제공하는 클래스
•
Plain JDBC의 문제점
◦
쿼리를 실행하기 전과 후에 많은 코드를 작성해야 한다. (연결생성,명령문 등등)
◦
예외 처리 코드와 트랜잭션 처리등에 시간과 자원이 소모
◦
이러한 문제점을 보완하여 생겨난 것이 Spring JDBC
JDBCTemplate이 제공하는 기능
실행 : insert나 Update와 같이 DB의 데이터에 변경이 일어나는 쿼리를 수행하는 작업
조회 : select를 이용해 데이터를 조회하는 작업
배치 : 여러 개의 쿼리를 한 번에 수행해야 하는 작업
jdbcTemplate을 사용하면 커넥션 연결/종료와 같은 세부 작업을 개발자가 직접 처리 하지 않아도 된다.
JDBCTemplate을 활용한 UserDao 클래스
